loop

배열의 데이터를 꺼낼 때 for, for of, foreach 예제

1차원 배열

for문


let arr = ["가","나","다","라"];

for(let i=0;i<arr.length;i++){

    console.log(arr[i]);

}

for of문


let arr = ["가","나","다","라"];

for(let el of arr){

    console.log(el);

}

forEach 메서드


let arr = ["가","나","다","라"];

arr.forEach(function(el, idx){

    console.log("arr[" + idx "] = " + el);

})

결과

가
나
다
라

2차원 배열

for문


let arr = [

    ["서울시청","https://www.seoul.go.kr/"],
    ["경기도청","https://www.gg.go.kr/"],
    ["제주도청","https://www.jeju.go.kr/"],
    ["강원도청","https://state.gwd.go.kr/"]

];


for(let i=0;i<arr.length;i++){

    console.log("기관명 : " + arr[i][0]);
    console.log("누리집 : " + arr[i][1]);

}

for of문


let arr = [

    ["서울시청","https://www.seoul.go.kr/"],
    ["경기도청","https://www.gg.go.kr/"],
    ["제주도청","https://www.jeju.go.kr/"],
    ["강원도청","https://state.gwd.go.kr/"]

];


for(let el of arr){

    console.log("기관명 : " + arr[0]);
    console.log("누리집 : " + arr[1]);

}

forEach 메서드


let arr = [

    ["서울시청","https://www.seoul.go.kr/"],
    ["경기도청","https://www.gg.go.kr/"],
    ["제주도청","https://www.jeju.go.kr/"],
    ["강원도청","https://state.gwd.go.kr/"]

];


arr.forEach(function(el, idx){

    console.log("기관명 : " + el[0]);
    console.log("누리집 : " + el[1]);

})

출력결과

기관명 : 서울시청
누리집 : https://www.seoul.go.kr/
기관명 : 경기도청
누리집 : https://www.gg.go.kr/
기관명 : 제주도청
누리집 : https://www.jeju.go.kr/
기관명 : 강원도청
누리집 : https://state.gwd.go.kr/

객체 배열 (Object Array)

for문


let arr = [

    {
    orgname:"서울시청", 
    url:"https://www.seoul.go.kr/", 
    latitude:"37.56677014701592", 
    longitude:"126.97867491234639"
    },

    {
    orgname:"경기도청", 
    url:"https://www.gg.go.kr/", 
    latitude:"37.28893135508412", 
    longitude:"127.05347693534611"
    },

    {
    orgname:"제주도청", 
    url:"https://www.jeju.go.kr/", 
    latitude:"33.48889985012181", 
    longitude:"126.49822386525447"},

    {
    orgname:"강원도청", 
    url:"https://state.gwd.go.kr/", 
    latitude:"37.88530735666828", 
    longitude:"127.72982257639035"
    }

];


for(let i=0;i<arr.length;i++){

console.log("기관명 : " + arr[i].orgname);
console.log("누리집 : " + arr[i].url);
console.log("위도 : " + arr[i].latitude);
console.log("경도 : " + arr[i].longitude);


}


for of문


let arr = [

    {
    orgname:"서울시청", 
    url:"https://www.seoul.go.kr/", 
    latitude:"37.56677014701592", 
    longitude:"126.97867491234639"
    },

    {
    orgname:"경기도청", 
    url:"https://www.gg.go.kr/", 
    latitude:"37.28893135508412", 
    longitude:"127.05347693534611"
    },

    {
    orgname:"제주도청", 
    url:"https://www.jeju.go.kr/", 
    latitude:"33.48889985012181", 
    longitude:"126.49822386525447"},

    {
    orgname:"강원도청", 
    url:"https://state.gwd.go.kr/", 
    latitude:"37.88530735666828", 
    longitude:"127.72982257639035"
    }

];


for(let el of arr){

console.log("기관명 : " + el.orgname);
console.log("누리집 : " + el.url);
console.log("위도 : " + el.latitude);
console.log("경도 : " + el.longitude);

}

forEach 메서드


let arr = [

    {
    orgname:"서울시청", 
    url:"https://www.seoul.go.kr/", 
    latitude:"37.56677014701592", 
    longitude:"126.97867491234639"
    },

    {
    orgname:"경기도청", 
    url:"https://www.gg.go.kr/", 
    latitude:"37.28893135508412", 
    longitude:"127.05347693534611"
    },

    {
    orgname:"제주도청", 
    url:"https://www.jeju.go.kr/", 
    latitude:"33.48889985012181", 
    longitude:"126.49822386525447"},

    {
    orgname:"강원도청", 
    url:"https://state.gwd.go.kr/", 
    latitude:"37.88530735666828", 
    longitude:"127.72982257639035"
    }

];


arr.forEach(function(el, idx){

console.log("기관명 : " + el.orgname);
console.log("누리집 : " + el.url);
console.log("위도 : " + el.latitude);
console.log("경도 : " + el.longitude);

});

출력결과

기관명 : 서울시청
누리집 : https://www.seoul.go.kr/
위도 : 37.56677014701592
경도 : 126.97867491234639
기관명 : 경기도청
누리집 : https://www.gg.go.kr/
위도 : 37.28893135508412
경도 : 127.05347693534611
기관명 : 제주도청
누리집 : https://www.jeju.go.kr/
위도 : 33.48889985012181
경도 : 126.49822386525447
기관명 : 강원도청
누리집 : https://state.gwd.go.kr/
위도 : 37.88530735666828
경도 : 127.72982257639035

성능 차이

  1. for 문
    반복 조건을 미리 정하여 인덱스로 배열에 접근하기 때문에 빠르다.

  2. for of 문
    ES6에 도입된 반복문으로 배열또는 iterable 객체에서 순차적으로 요소를 가져오는 방식이다.
    for문보다 약간 느리지만 가독성이 좋다.

  3. forEach 메서드
    forEach는 배열의 각 요소에 대한 콜백함수를 실행하는 메소드.
    콜백 함수 호출로 인한 오버헤드 때문에 for, for of 보다 성능이 떨어질 수 있다고 한다.

반응형

Scanner 클래스

java.util 패키지에서 제공하는 Scanner 클래스를 이용하여 화면에서 입력받을 수 있다.

자바를 공부하면서 프로그램 입력처리할 때 가장 많이 사용한다.

1. import

아래와 같이 import 선언

import java.util.Scanner;

2. 객체 생성

// 키보드 입력
Scanner scanner = new Scanner(System.in);

// 파일 입력
Scanner scanner = new Scanner(new File("파일경로"));

// 문자열 입력
Scanner scanner = new Scanner("입력 문자열");

3. 주요 메소드

next()

공백을 기준으로 하나의 문자열을 읽음

공백을 기준으로 한 번에 입력 가능하다.


import java.util.Scanner;

public class J101_Scanner {

    public static void main(String[] args) {

        Scanner sc = new Scanner(System.in);

        System.out.println("데이터를 입력 : ");

        String a = sc.next();
        String b = sc.next();
        String c = sc.next();

        System.out.println(a);
        System.out.println(b);
        System.out.println(c);

        sc.close();

    }

}

실행결과

데이터를 입력 > 
a b c
a
b
c

nextLine()

한 줄을 읽음(공백도 포함)

import java.util.Scanner;

public class J101_Scanner {

    public static void main(String[] args) {

        Scanner sc = new Scanner(System.in);

        System.out.println("데이터를 입력 > ");
        String a = sc.nextLine();
        System.out.println("데이터를 입력 > ");
        String b = sc.nextLine();
        System.out.println("데이터를 입력 > ");
        String c = sc.nextLine();

        System.out.println(a);
        System.out.println(b);
        System.out.println(c);

        sc.close();

    }

}

실행결과

데이터를 입력 > 
a b c
데이터를 입력 > 
x y z
데이터를 입력 > 
1 2 3
a b c
x y z
1 2 3

자주 사용하는 타입별 메소드

필요한 입력값에 맞춰서 아래의 메소드를 사용

  • nextByte()
  • nextInt()
  • nextFloat()
  • nextDouble()

hasNext()

입력에 데이터가 남아 있는지 확인

hasNextInt()

다음 입력값이 정수인지 확인


import java.util.Scanner;

public class J101_Scanner_has {

    public static void main(String[] args) {

        String data = "1 q 2 w 3 e 4 r";
        Scanner sc = new Scanner(data);

        while (sc.hasNext()) {

            if (sc.hasNextInt()) {

                System.out.println("숫자: " + sc.nextInt());

            } else {

                System.out.println("문자열: " + sc.next());
            }

        }

        sc.close(); 
    }

}

숫자: 1
문자열: q
숫자: 2
문자열: w
숫자: 3
문자열: e
숫자: 4
문자열: r

형변환 필요할 때

next와, nextLine 메소드는 문자이기 때문에 숫자를 입력 받으면 형변환이 필요하다
nextInt를 사용하지 않고 정수 값이 필요할 때는 형변환을 한다.


// string -> Integer
String a = sc.next();
System.out.println(Integer.parseInt(a));

// Integer -> String
int b = sc.nextInt();
System.out.println(String.valueOf(b));
변환 방향 사용 방법 메서드/기법
문자 → 정수 Character.getNumericValue(), Integer.parseInt() 단일 문자 또는 문자열 처리
정수 → 문자 캐스팅 (char), Character.forDigit() ASCII 활용 또는 변환 함수
문자열 → 정수 Integer.parseInt() 문자열 전체 처리
정수 → 문자열 String.valueOf(), Integer.toString() 문자열 변환 함수
반응형


<!DOCTYPE html>
<html lang="ko">
<head>
    <meta charset="UTF-8">
    <meta name="viewport" content="width=device-width, initial-scale=1.0">
    <title>Document</title>
</head>
<body>


<form action="/submit.do" method="post" onsubmit="myValidator(); return false;" class="use_validator">

<fieldset> 
<legend>폼 양식</legend>


<ul>
    <li>input text only string</li>
    <li><input type="text" name="user_name" title="이름" class="use_vali only_string" placeholder="이름"></li>
</ul>

<ul>
    <li>input text only number</li>
    <li><input type="text" name="user_tel" title="연락처" class="use_vali only_number" maxlength="11" placeholder="연락처"></li>
</ul>

<ul>
    <li>input checkbox</li>
    <li>

        <input type="checkbox" name="ott[]" title="ott" value="넷플릭스" class="use_vali">
        <label for="">넷플릭스</label>

        <input type="checkbox" name="ott[]" title="ott" value="쿠팡플레이" class="use_vali">
        <label for="">쿠팡플레이</label>

        <input type="checkbox" name="ott[]" title="ott" value="왓챠" class="use_vali">
        <label for="">왓챠</label>

        <input type="checkbox" name="ott[]" title="ott" value="디즈니플러스" class="use_vali">
        <label for="">디즈니플러스</label>

        <input type="checkbox" name="ott[]" title="ott" value="티빙" class="use_vali">
        <label for="">티빙</label>

    </li>
</ul>


<ul>
    <li>input radio</li>
    <li>

        <input type="radio" name="gender" value="M" title="성별" class="use_vali">남
        <input type="radio" name="gender" value="F" title="성별" class="use_vali">여

    </li>
</ul>

<ul>
    <li>input password</li>
    <li>
        <input type="password" name="passwd" title="비밀번호" class="use_vali">
    </li>
</ul>


<ul>
    <li>textarea</li>
    <li><textarea name="remarks"  title="비고" class="use_vali"></textarea></li>
</ul>

<ul>
    <li>select</li>
    <li>
        <select name="site_list" title="사이트" class="use_vali">
            <option value="">:: 선택 ::</option>
            <option value="네이버">네이버</option>
            <option value="구글">구글</option>
            <option value="다음">다음</option>
        </select>
    </li>
</ul>


<ul>
    <li>취미</li>
    <li>

        <input type="checkbox" name="hobby[]" class="use_vali" title="취미" id="hobby1">
        <label for="hobby1"><span class="custom_inp"></span>독서</label>

        <input type="checkbox" name="hobby[]" class="use_vali" title="취미" id="hobby2">
        <label for="hobby2"><span class="custom_inp"></span>여행</label>

        <input type="checkbox" name="hobby[]" class="use_vali has_etc" title="취미" id="hobby3">
        <label for="hobby3"><span class="custom_inp"></span>기타</label>


        <input type="text" name="hobby_etc" class="use_vali" title="취미 기타" disabled>


    </li>
</ul>

</fieldset>

<input type="submit" value="확인">


</form>    


<script>


// form과 유효성 검사를 할 요소 
let frm = document.querySelector("form.use_validator");
let el = document.querySelectorAll(".use_vali");
let onlyStrEl = document.querySelectorAll(".only_string");
let onlyNumEl = document.querySelectorAll(".only_number");


// input, select, textarea 유효성검사 
function myValidator(){

    for(let i=0;i<el.length;i++){

        if(el[i].disabled) continue;

        let tagName = el[i].tagName;
        let type = el[i].getAttribute("type");
        let title = el[i].getAttribute("title");
        let name = el[i].getAttribute("name");
        let chkEl = document.getElementsByName(name);

        if(tagName == "INPUT"){

            if(type == "text" || type == "password") {

                if(el[i].value == ""){

                    alert(`${title}을(를) 입력해주세요`);
                    el[i].focus();
                    return false;

                }

            } else if(type == "checkbox" || type == "radio") {

                let count = 0;

                for(let j=0;j<chkEl.length;j++){

                    if(chkEl[j].checked) count++;

                }

                if(count < 1){

                    alert(`${title}을(를) 선택해주세요.`);
                    el[i].focus();
                    return false;

                }

            }

        } else if(tagName == "TEXTAREA"){

            if(el[i].value == ""){

                el[i].focus();
                alert(`${title}을(를) 선택해주세요.`);
                return false;

            }

        } else if(tagName == "SELECT"){

            let slctVal = el[i].options[el[i].selectedIndex].value;

            if(slctVal == ""){

                el[i].focus();
                alert(`${title}을(를) 선택해주세요.`);
                return false;

            }

        } 

    }

    return true;

}


// 유효성 검사를 사용하는 .use_vali에 대한 클릭 이벤트 
el.forEach(element => { element.addEventListener("click", isEtc); });

// 문자
onlyStrEl.forEach(element => { element.addEventListener("keyup", () => myValidator_onlyString(element)); });

// 숫자
onlyNumEl.forEach(element => { element.addEventListener("keyup", () => myValidator_onlyNumber(element)); });


// 클릭 이벤트 발생시 추가 인풋에 대한 disabled 처리 
function isEtc(){

    if(!this.classList.contains("has_etc")) return false;

    let name = this.getAttribute("name").replace("[]","");
    let etcEl = document.querySelector(`[name="${name}_etc"]`);

    if (this.checked) {

        etcEl.removeAttribute("disabled");
        etcEl.focus();

    } else {

        etcEl.setAttribute("disabled", true);
        etcEl.value = "";

    }

}


// 한영 제외 제거 함수
function myValidator_onlyString(el){

    el.value = el.value.replace(/[^ㄱ-ㅎ가-힣a-zA-Z]/g,'');

}

// 숫자 제외 제거 함수
function myValidator_onlyNumber(el){

    el.value = el.value.replace(/[^0-9]/g,'');

}


</script>


</body>
</html>
반응형

CSS 함수

CSS 변수 선언

홈페이지 color system이 있다면 변수로 저장해서 사용할 수 있고 유지보수에 유리하다.

:root {변수명:속성값}으로 작성하며 변수명 앞에는 하이픈 두 개(--)로 시작해야한다. 변수명에는 하이픈, 언더바 사용가능하다.

--basic_color:#333;
--basic-color:#000;
:root {
--main-txt-color:#333;
--sub-txt-color:#555
--main-bg-color:#ddd;
--common-border-color:#fafafa;
}

val()

val(변수명) 함수로 값을 지정할 수 있다.

h2 {color:val(--main-txt-color)}
p {color:val(--sub-main-color)}
section {background:val(--main-bg-color)}
div {border-color:val(--common-border-color)}

calc()

calculation 함수에 값은 크기나, 각도, 시간 백분율, 숫자 등 가능
너비를 계산할 때 자주 사용한다.

div {width:calc(100% - 100px)}
  • div요소 100%에서 -100px을 뺀 값을 계산한다.
  • 사칙연산자(+, -, *, /) 사용 가능
  • 피연산자는 숫자만 가능
  • 연산자 사이에 띄어쓰기 필수
  • 0으로 나눌 수 없다.

min()

min() 함수는 괄호 안에 나열된 값 중에서 가장 작은 값을 적용한다.

min(value1, value2, ...)
img {width:min(50%, 400px);}

max()

max() 함수는 괄호 안에 나열된 값 중에서 가장 큰 값을 적용한다.

min(value1, value2, ...)
img {width:min(50%, 400px);}

clamp()

clamp() 함수는 값의 범위를 고정 및 제한한다

clamp(최솟값, 최적값, 최댓값)
p {font-size:clamp(1rem, 1vw, 2em);}
반응형

'WEB PUBLISHING' 카테고리의 다른 글

가상요소(Pseudo-elements)  (0) 2024.10.25

가상요소(Pseudo-elements)

::first-line

첫번째 줄에 스타일을 적용

p::first-line {...}

::first-letter

첫 번째 단어에 스타일을 적용

p::first-letter {...}

::before

요소 앞에 콘텐츠를 추가

div::before {content:""}

::after

요소 뒤에 콘텐츠를 추가

div::after {content:""}

::before, ::after 응용

  • clearfix
.float_r::after {content:"";display:block;clear:both}
  • 불릿

ul li {padding:0 0 0 10px;position:relative}  
ul li::before {content:"";width:10px;height:10px;background:url("/src/img/bullet.png") 0 0 no-repeat;position:absolute:left:0;top:0}   

/* 아래의 방식도 가능 */
ul li::before {content:url("/src/img/bullet.png")}  
  • 뱃지(badge) : 불릿방식과 같으며 알림이 떴을 때

ul li {padding:0 0 0 10px;position:relative}  
ul li.is_alarm:before {content:"";width:10px;height:10px;background:url("/src/img/bullet.png") 0 0 no-repeat;position:absolute:left:0;top:0}  
  • 가상요소는 DOM 접근이 어렵기 때문에 토글 클래스로 처리하는게 편하다.

  • 넘버링

    • ol의 list-style로 가능하나 들여쓰거나 내어쓸 수 있다.

세미콜론 개수

css2에서 :가상요소로 등장하였고 호환성 및 이전 버전의 일관성의 이유로 세미콜론 하나도 작동되지만 css3에서는 ::가상요소로 권장하고 있다.

반응형

'WEB PUBLISHING' 카테고리의 다른 글

CSS 함수  (0) 2024.10.25

형변환(Type Casting)

형변환이란 한 데이터 타입의 값을 다른 데이터 타입으로 변환하는 과정이다.

목차

  1. 기본타입 허용 범위 크기
  2. 자동형변환(묵시적형변환)
  3. 자동형변환 예외
  4. 자동형변환 예시
  5. 강제형변환(명시적형변환)
  6. 강제형변환 예시

1. 기본타입 허용 범위 크기

  • byte < short < int < long < float < double

2. 자동형변환(묵시적형변환)

작은 데이터 타입에서 큰 데이터 타입으로의 변환이 발생할 때
Java가 자동으로 처리하는 것을 자동형변환이라고하고 데이터 손실이 없다.

큰 허용 범위타입 = 작은 허용 범위타입
byte b = 10
int num = b;

예시) byte -> int

  • byte가 더해지는 과정에서 int로 자동형변환

byte b1 = 10;
byte b2 = 10;
int result = b1 + b2;
System.out.println(result); // 20

예시) int -> long

  • int가 더해지는 과정에서 long으로 자동형변환
    int i1 = 10;
    int i2 = 10;
    long result = i1 + i2;
    System.out.println(result); // 20

예시) long -> float, double


long l1 = 5000000000L;
float f1 = l1;
double d1 = l1;

System.out.println(f1); // 5.0E9
System.out.println(d1); // 5.0E9

예시) float -> double


float f1 = 1.5F;
double d1 = 1.52;
double doubleResult1 = f1 + d1;
System.out.println(doubleResult1); // 3.02

3. 자동형변환 예외(byte->char)

  • byte에서 char로 자동형변환을 시도하면 각각 허용범위가 다르기 때문에 Type mismatch 에러가 나온다.

  • byte : -128 ~ 127 / char : 0 ~ 65533


byte b1 = 10;
byte b2 = 10;
char result = b1 + b2; 
// Type mismatch: cannot convert from int to char

4. 자동형변환 예시


char charValue = '가';
int intValue = charValue;
System.out.println(intValue); // 유니코드로 출력 44032


int intValue1 = 11;
long longValue1 = intValue1;
System.out.println(longValue1); // 11


long longValue2 = 100;
float floatValue2 = longValue2;
System.out.println(floatValue2); // 100.0

float floatValue3 = 100.5F;
double doubleValue3 = floatValue3;
System.out.println(doubleValue3); // 100.5


float f2 = 2.2f;
float f3 = 2.2f;
double doubleResult2 = f2 + f3;

System.out.println(doubleResult2); // 4.400000095367432

5. 강제형변환(명시적 형변환)

큰 데이터 타입에서 작은 데이터 타입으로 변환할 때는 명시적으로 형변환을 해야한다.
이 경우 데이터 손실이 발생할 수 있다.

  • 작은 허용범위 타입 = (작은 허용범위 타입) 큰허용범위타입

5-1. int타입은 byte타입보다 더 큰 허용범위를 가지고 있어 명시적형변환이 필요하다.


int intValue = 10;
byte byteValue = (byte) intValue;
System.out.println(byteValue); // 10

5-2. 정수값으로 char타입에서 문자를 출력하기 위해 변환한다.


int intValue1 = 65;
char charValue1 = (char) intValue1;
System.out.println(charValue1);

5-3. 실수(float, double)은 정수타입(byte, short, int, long)으로 자동형변환 되지 않는다.

소수점 부분은 버려지고 정수부분만 저장된다.


double doubleValue2 = 3.14;
int intValue2 = (int) doubleValue2;
System.out.println(intValue2);

6. 강제형변환 예시

int intValue = 44032;
char charValue = (char) intValue;
System.out.println(charValue); // 가


long longValue = 500;
intValue = (int) longValue;
System.out.println(intValue); // 500


double doubleValue = 3.14;
intValue = (int) doubleValue;
System.out.println(intValue); // 3
반응형

#변수의 타입

자바 변수의 타입에는 기본형(Primitive Type), 참조형(Reference Type)이 있다.

기본형은 정수타입, 실수타입, 논리타입으로 분류된다.


기본형에는 총 8개의 타입이 있다.

- 정수타입 : byte, char, short, int, long

- 실수타입 : float, double

- 논리타입 : boolean


참조형에는 총 4개가 있다.

- 배열(Array)

- 열거형(Enum)

- 클래스(Class)

- 인터페이스(Interface)


정수(Integer)란?

정수란 소수나 분수가 없는 수의 집합으로, 양의 정수(자연수), 음의 정수, 0이 있다.

정수는 수학에서 가장 기본적인 수의 개념 중 하나로, 우리가 일상에서 숫자를 셀 때 사용하는 양의 정수(예: 1, 2, 3...)와 온도 등에서 사용하는 음의 정수(예: -1, -2, -3...)로 나뉜다.


byte 타입

- 메모리 사용 크기 : 1byte(8bit)

- 저장값 범위 :  -27 ~ (27 - 1) / -128 ~ 127

- 저장값 범위 계산 방법 :  -2(n-1) ~ 2(n-1)-1, n은 비트


byte 타입 실습 예제


line 12 주석을 해제하면 변수의 범위를 넘어갔기 때문에 Type missmatch 오류가 발생한다.


1
2
3
4
5
6
7
8
9
10
11
12
13
14
15
16
17
18
19
20
21
22
23
24
25
26
27
28
29
30
31
32
package j241002;
 
public class J101_PrimitiveType_Byte {
 
    public static void main(String[] args) {
        
        byte by1 = -128;
        byte by2 = -100;
        byte by3 = 0;
        byte by4 = 100;
        byte by5 = 127;
        //byte var6 = 128;
        
        System.out.println(by1);
        System.out.println(by2);
        System.out.println(by3);
        System.out.println(by4);
        System.out.println(by5);
        //System.out.println(by6);
        
        /*
          
          Description    Resource    Path    Location    Type
         Type mismatch: cannot convert from int to byte    ---.java    /---/---/--- line 12    Java Problem
          
         */
        
 
    }
 
}
 
cs


char 타입

- 메모리 사용 크기 : 2byte(16bit)

- 저장값 범위 : 0 ~ 216 - 1 / 0 ~ 65535


char 타입 예제


char는 '( Singe Qoutation Mark, 홑따옴표)를 사용하여 문자를 저장하고 n진수로 변환된 값도 저장가능하다.

Character는 사전적인 의미로 문자, 기호를 뜻하는데 왜 정수타입인가 이상함을 느낄 수 있다.


1
2
3
4
5
6
7
8
9
10
11
12
13
14
15
16
17
18
19
20
21
22
23
24
25
26
package j241002;
 
public class J101_PrimitiveType_Char {
 
    public static void main(String[] args) {
        
            
        char c11 = 'A'// 문자
        char c22 = 65// 10진수
        char c33 = '\u0041'// 16진수
        char c44 = '가';
        char c55 = 44032;
        char c66 = '\uac00';
        
        System.out.println(c11);
        System.out.println(c22);
        System.out.println(c33);
        System.out.println(c44);
        System.out.println(c55);
        System.out.println(c66);
                
        
    }
}
 
 
cs


문자(character) 컴퓨터 내부에서는 숫자(정수)로 인코딩되어 처리되기 때문이라고 볼 수 있다.

작은 따옴표로 감싼 형태를 문자 리터럴이라고 하고 유니코드로 변환되어 저장이 된다.

각 문자, 기호에 대응되는 고유한 정수값이 있기때문에 문자도 숫자처럼 저장되고 연산될 수 있다. 

예를 들어 'A' + 1을 수행하면 66이 되어 문자 'B'로 변환된다.

※ 유니코드에 대해서는 추후 작성.


int 타입

- 메모리 사용 크기 : 4byte(32bit)

- 저장값 범위 :  -231 ~ (231 - 1) / -2,147,483,648 ~ 2,147,483,647(약20억)

- 저장값 범위 계산 


210 = 1024 ≒ 103


231

= 210 x 210 x 210 x 2

= 1024 x 1024 x 1024 x 2

≒ 2 x 10⁹


int 타입 예제

10진수 뿐만 아니라 2, 8, 16진수 저장도 가능하다.

개발자에 의해 직접 입력된 값을 리터럴(literal)이라고 하며 리터럴 중 정수로 인식되는 경우는 다음과 같다.


- 2진수(Binary) : Ob, 0B로 시작 / 0과 1로 구성 
- 8진수(Octal) : 0부터 시작, 0~7로 구성
- 10진수(Decimal) : 0~9 로 구성 
- 16진수(Hexadecimal) : 0x, 0X로 시작 0~9로 구성되며 그 이상부터는  A(10),B(11),C(12),D(13),E(14),F(15) 

※ 16진수는 웹에 색상(ex. #000000), 메모리주소(ex. 0x7fff) 등에 사용

※ 진법 변환에 관해서는 추후 작성.


1
2
3
4
5
6
7
8
9
10
11
12
13
14
15
16
17
18
19
20
package j241002;
 
public class J101_PrimitiveType_Int {
 
    public static void main(String[] args) {
        
        int var1 = 0b1001// 2진수
        int var2 = 0206// 8진수
        int var3 = 111// 10진수
        int var4 = 0xAF// 16진수
        
        System.out.println("2진수 : " + var1);
        System.out.println("8진수 : " + var2);
        System.out.println("10진수 : " + var3);
        System.out.println("16진수 : " + var4);
                
    }
 
}
 
cs


\

long 타입

- 메모리 사용 크기 : 8byte(64bit)

- 저장값 범위 :  -263 ~ (263 - 1) / -9,223,372,036,854,775,808 ~ 9,223,372,036,854,775,807


long 타입 예제

int의 범위를 초과할 경우 long을 사용

정수 리터럴 뒤 l, L을 추가(대문자 권장)


1
2
3
4
5
6
7
8
9
10
11
12
13
14
15
16
17
18
package j241002;
 
public class J101_PrimitiveType_Long {
 
    public static void main(String[] args) {
        
        //long var1 = 12345678912;
        long var2 = 12345678912L;
        
        //System.out.println(var1);
        System.out.println(var2);


    }
 
}
 
cs


float 타입

- 메모리 사용 크기 : 4byte(32bit)

- 저장값 범위 :  (1.4 x 10^-45) ~ (3.4 x 10^38)

- 정밀도 : 소수점 이하 약 7자리(6~9)


double 타입

- 메모리 사용 크기 : 8byte(64bit)

- 저장값 범위 :  (4.9 x 10^-324) ~ (1.8 x 10^308)

- 정밀도 : 소수점 이하 약 15자리(15~18)

※ float 보다 약 2배정도 정밀도가 높아서 double


float, double 정밀도 예제


1
2
3
4
5
6
7
8
9
10
11
12
13
14
15
16
17
18
19
20
21
22
23
24
25
26
27
28
29
package j241002;
 
public class J101_RealNumber_FloatDouble {
 
    public static void main(String[] args) {
 
 
        // 실수값 저장 
        //float var1 = 3.14; // type mismatch
        float var2 = 3.14f;
        double var3 = 3.14// float 보다 약 2배정도 정밀도가 높아서 double 
        
        // 정밀도 테스트 
        float var4 = 0.1234567890123456789f;
        double var5 = 0.1234567890123456789;
        
        
        //System.out.println(var1);
        System.out.println(var2);
        System.out.println(var3);
        System.out.println(var4);
        System.out.println(var5);


    }
 
}
 
cs


boolean 타입

- True, False를 저장하는 논리형 변수

- 참, 거짓에 따라 조건문, 제어문의 흐름을 변경한다.

- 불리언, 불린 등으로 불린다


boolean 예제

1
2
3
4
5
6
7
8
9
10
11
12
13
14
15
16
package j241002;
 
public class J101_PrimitiveType_Boolean {
 
    public static void main(String[] args) {
        
        boolean flag = false;
        boolean isRun = true;
        
        System.out.println(flag);
        System.out.println(isRun);
        
    }
 
}
 
cs
반응형

'JAVA' 카테고리의 다른 글

[JAVA][09] Scanner 클래스  (0) 2024.11.17
[JAVA][07] 형변환(Type Casting)  (0) 2024.10.22
[JAVA][05] 변수값 바꾸기1  (0) 2024.10.09
[JAVA][04] 변수(Variable)란?  (1) 2024.10.03
[JAVA][03] Hello World  (0) 2024.10.03

int x = 1, int y = 2 일때 두 변수의 값 교체하기


1. tmp 변수를 선언 후 x 값 저장

2. x에 y값 저장 

3. y에 tmp에 저장되어 있는 x값 저장


1
2
3
4
5
6
7
8
9
10
11
12
13
14
15
16
17
18
19
20
21
22
23
24
25
26
27
28
package j240930;
 
public class J101_4_VariableReplacement {
 
    public static void main(String[] args) {
        
        /*
         
        변수 x, y의 값을 서로 교체하여 출력하기
        
        */
        
        int x = 1;
        int y = 2;
        
        System.out.println(x+", "+y); // 1, 2
        
        int tmp = x;
        x = y;
        y = tmp;
        
        System.out.println(x+", "+y); // 2, 1
        
 
    }
 
}
 
cs
반응형

'JAVA' 카테고리의 다른 글

[JAVA][07] 형변환(Type Casting)  (0) 2024.10.22
[JAVA][06] 변수 기본 타입(Primitive Type)  (0) 2024.10.12
[JAVA][04] 변수(Variable)란?  (1) 2024.10.03
[JAVA][03] Hello World  (0) 2024.10.03
[JAVA][02] 이클립스 Perspective 설정  (0) 2024.10.03


1. 변수(Variable)

- 변하는 수, 변할 수 있는 수

- 데이터를 저장할 수 있는 메모리 공간

- 하나의 값만 저장 가능


2. 변수 선언 및 초기화

- 변수타입 변수이름;

- Ex) int num; // 변수타입 int , 변수이름 num

- 변수타입의 종류는 기본형 8개와, 참조형이 있다


3. 변수 초기화(Initialization)

- Ex) int num = 10;

- int형 타입(정수) 변수이름 num에 10이라는 값을 저장(초기화)


4. 변수 초기화가 필요한 이유

- JAVA는 문법이 엄격한 언어로 안정성을 위해 초기화가 강제됨(다른 언어에서는 초기화되지 않은 변수를 허용하기도 함)

- 로컬 변수는 스택 메모리에 저장되는데 스택 메모리는 매우 빠르게 생성/삭제되어서  쓰레기값(Garbage Value)이 남아 있을수 있기 때문

- 명시적 초기화는 변수의 초기상태를 알 수 있기 때문에 가독성, 유지보수성 향상 시킴.


1
2
3
4
5
6
7
8
9
10
11
12
13
14
15
16
17
18
19
20
21
22
23
24
25
26
27
28
29
package j240930;
 
public class J101_4_Variable {
 
    public static void main(String[] args) {
        
        // 변수 선언 (Variable Declaration)
        // 변수 : 변하는 수, 단 하나의 값을 저장할 수 있는 메모리 공간
        int a;
        int b;
        int c, d;
        
        
        // 변수 초기화(Variable Initialization) 
        // 대입연산자(=)를 이용히여 값을 저장(초기화)
        // 초기화가 필요한 이유?
        // 1. java에서는 안정성을 위하여 초기화가 강제됨
        // 2. 로컬 변수는 스택 메모리에 저장되는데 매우 빠르게 생성/삭제 되어서 쓰레기값(Garbage Value)이 남아 있을 수 있어서
        // 3. 명시적 초기화는 변수의 초기 상태를 알수 있기 때문에 가독성, 유지보수에 유리
        
        int w = 0;
        int x = 0;
        int y = 0, z = 0;
        
 
    }
 
}
 
cs


반응형

'JAVA' 카테고리의 다른 글

[JAVA][06] 변수 기본 타입(Primitive Type)  (0) 2024.10.12
[JAVA][05] 변수값 바꾸기1  (0) 2024.10.09
[JAVA][03] Hello World  (0) 2024.10.03
[JAVA][02] 이클립스 Perspective 설정  (0) 2024.10.03
[JAVA][02] 이클립스 설치  (1) 2024.10.01

# Hello World 출력


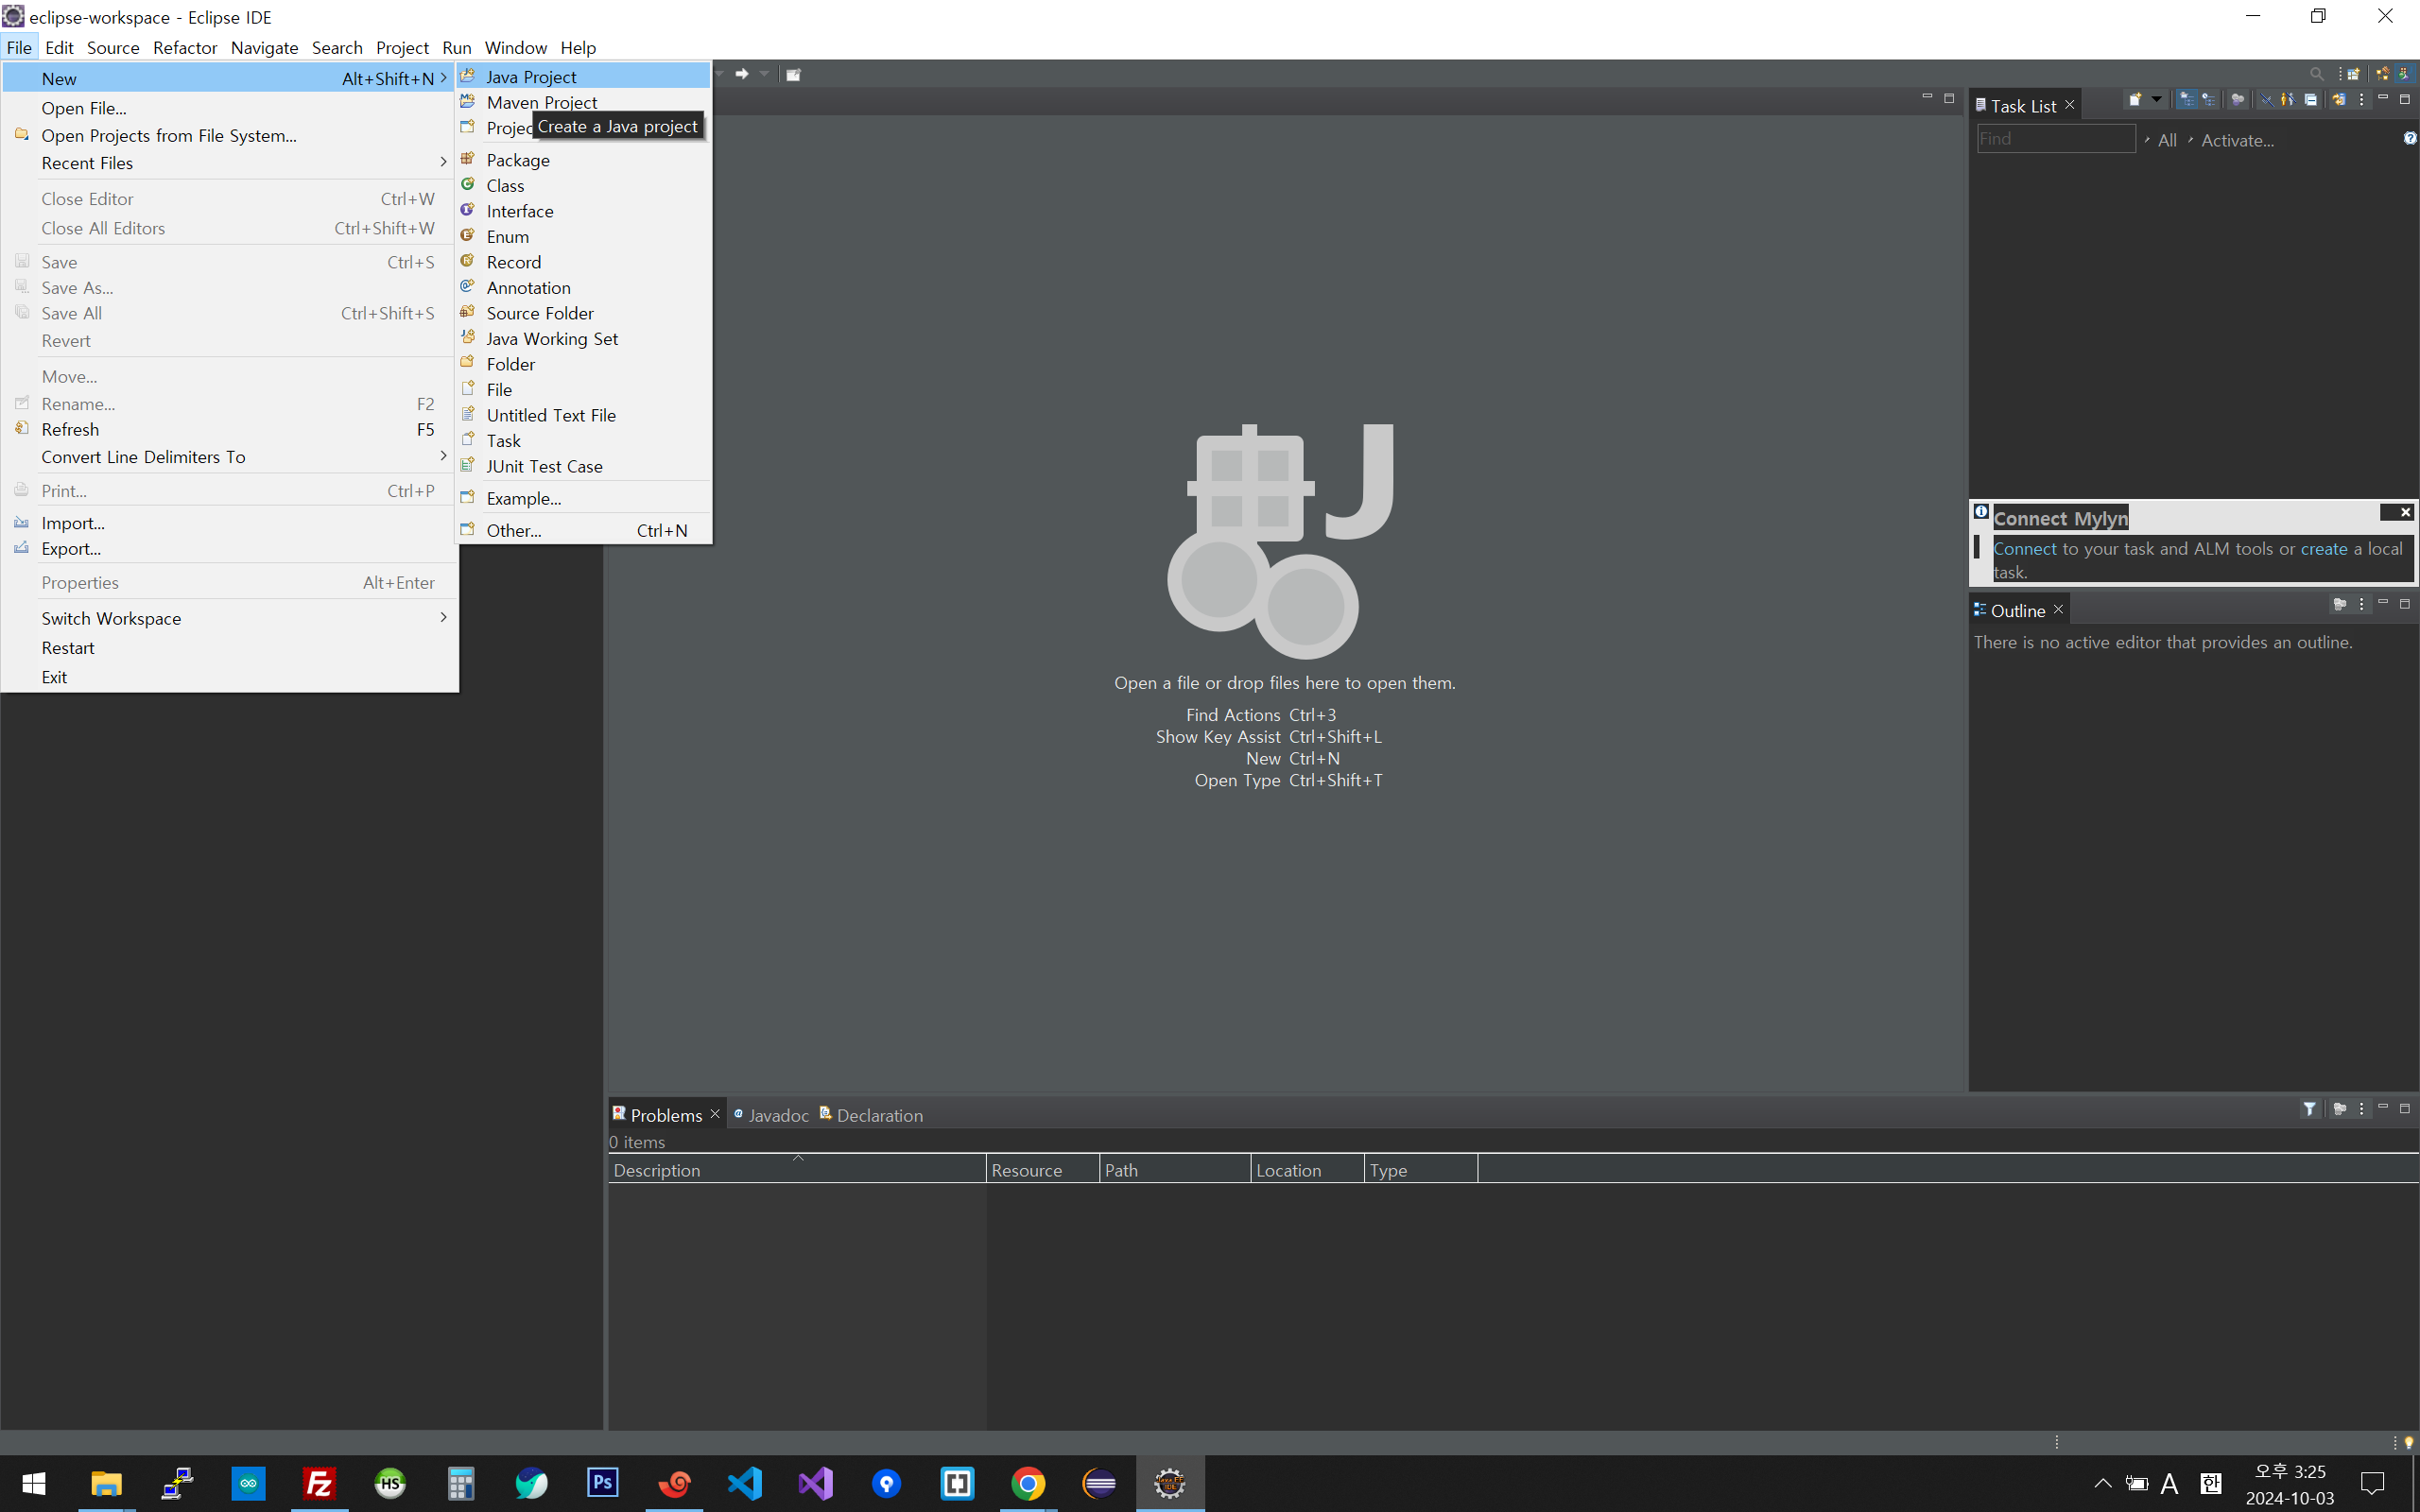
1. 프로젝트 생성

- File - New - Java Project 


자바 프로젝트 생성


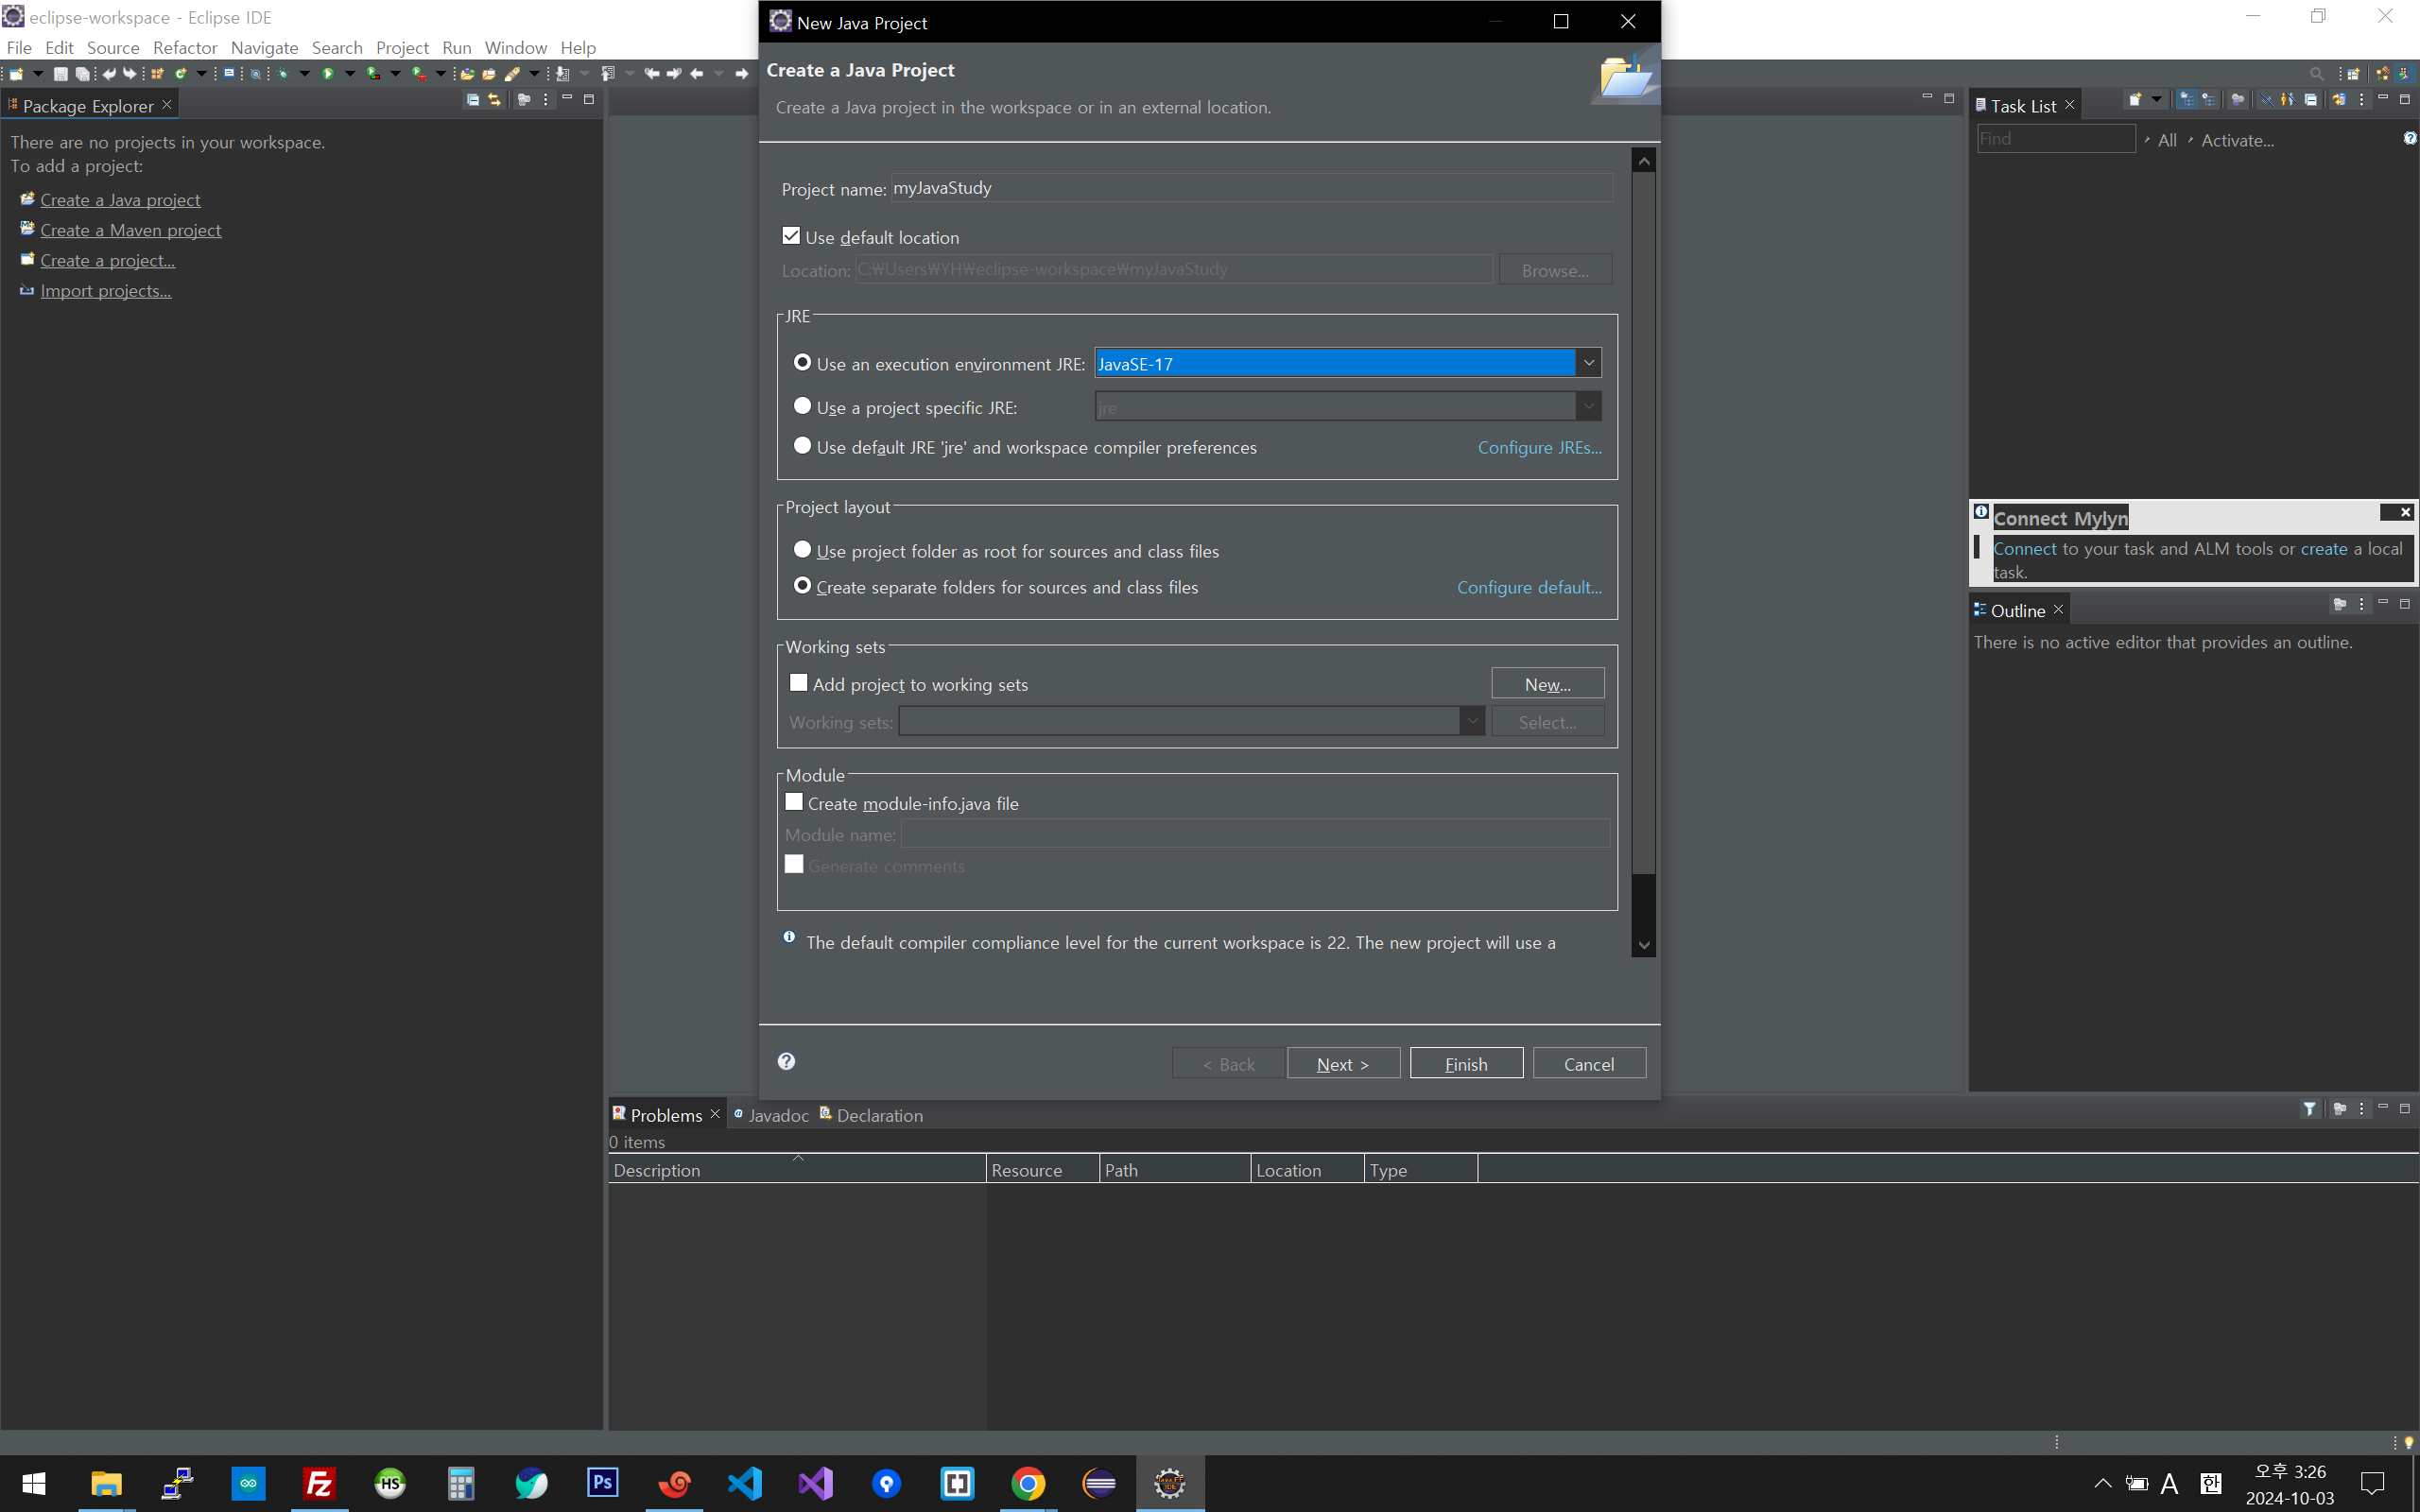
2. 프로젝트 설정

- Project name 입력

- JRE 17 선택


프로젝트 설정


3. 패키지 생성 생략


4. 클래스 파일 생성

- 프로젝트 우클릭 - New -  Class


클래스 파일 생성


5. 클래스 파일명 입력

- method stub에서 main 메소드 체크


클래스 파일명 입력


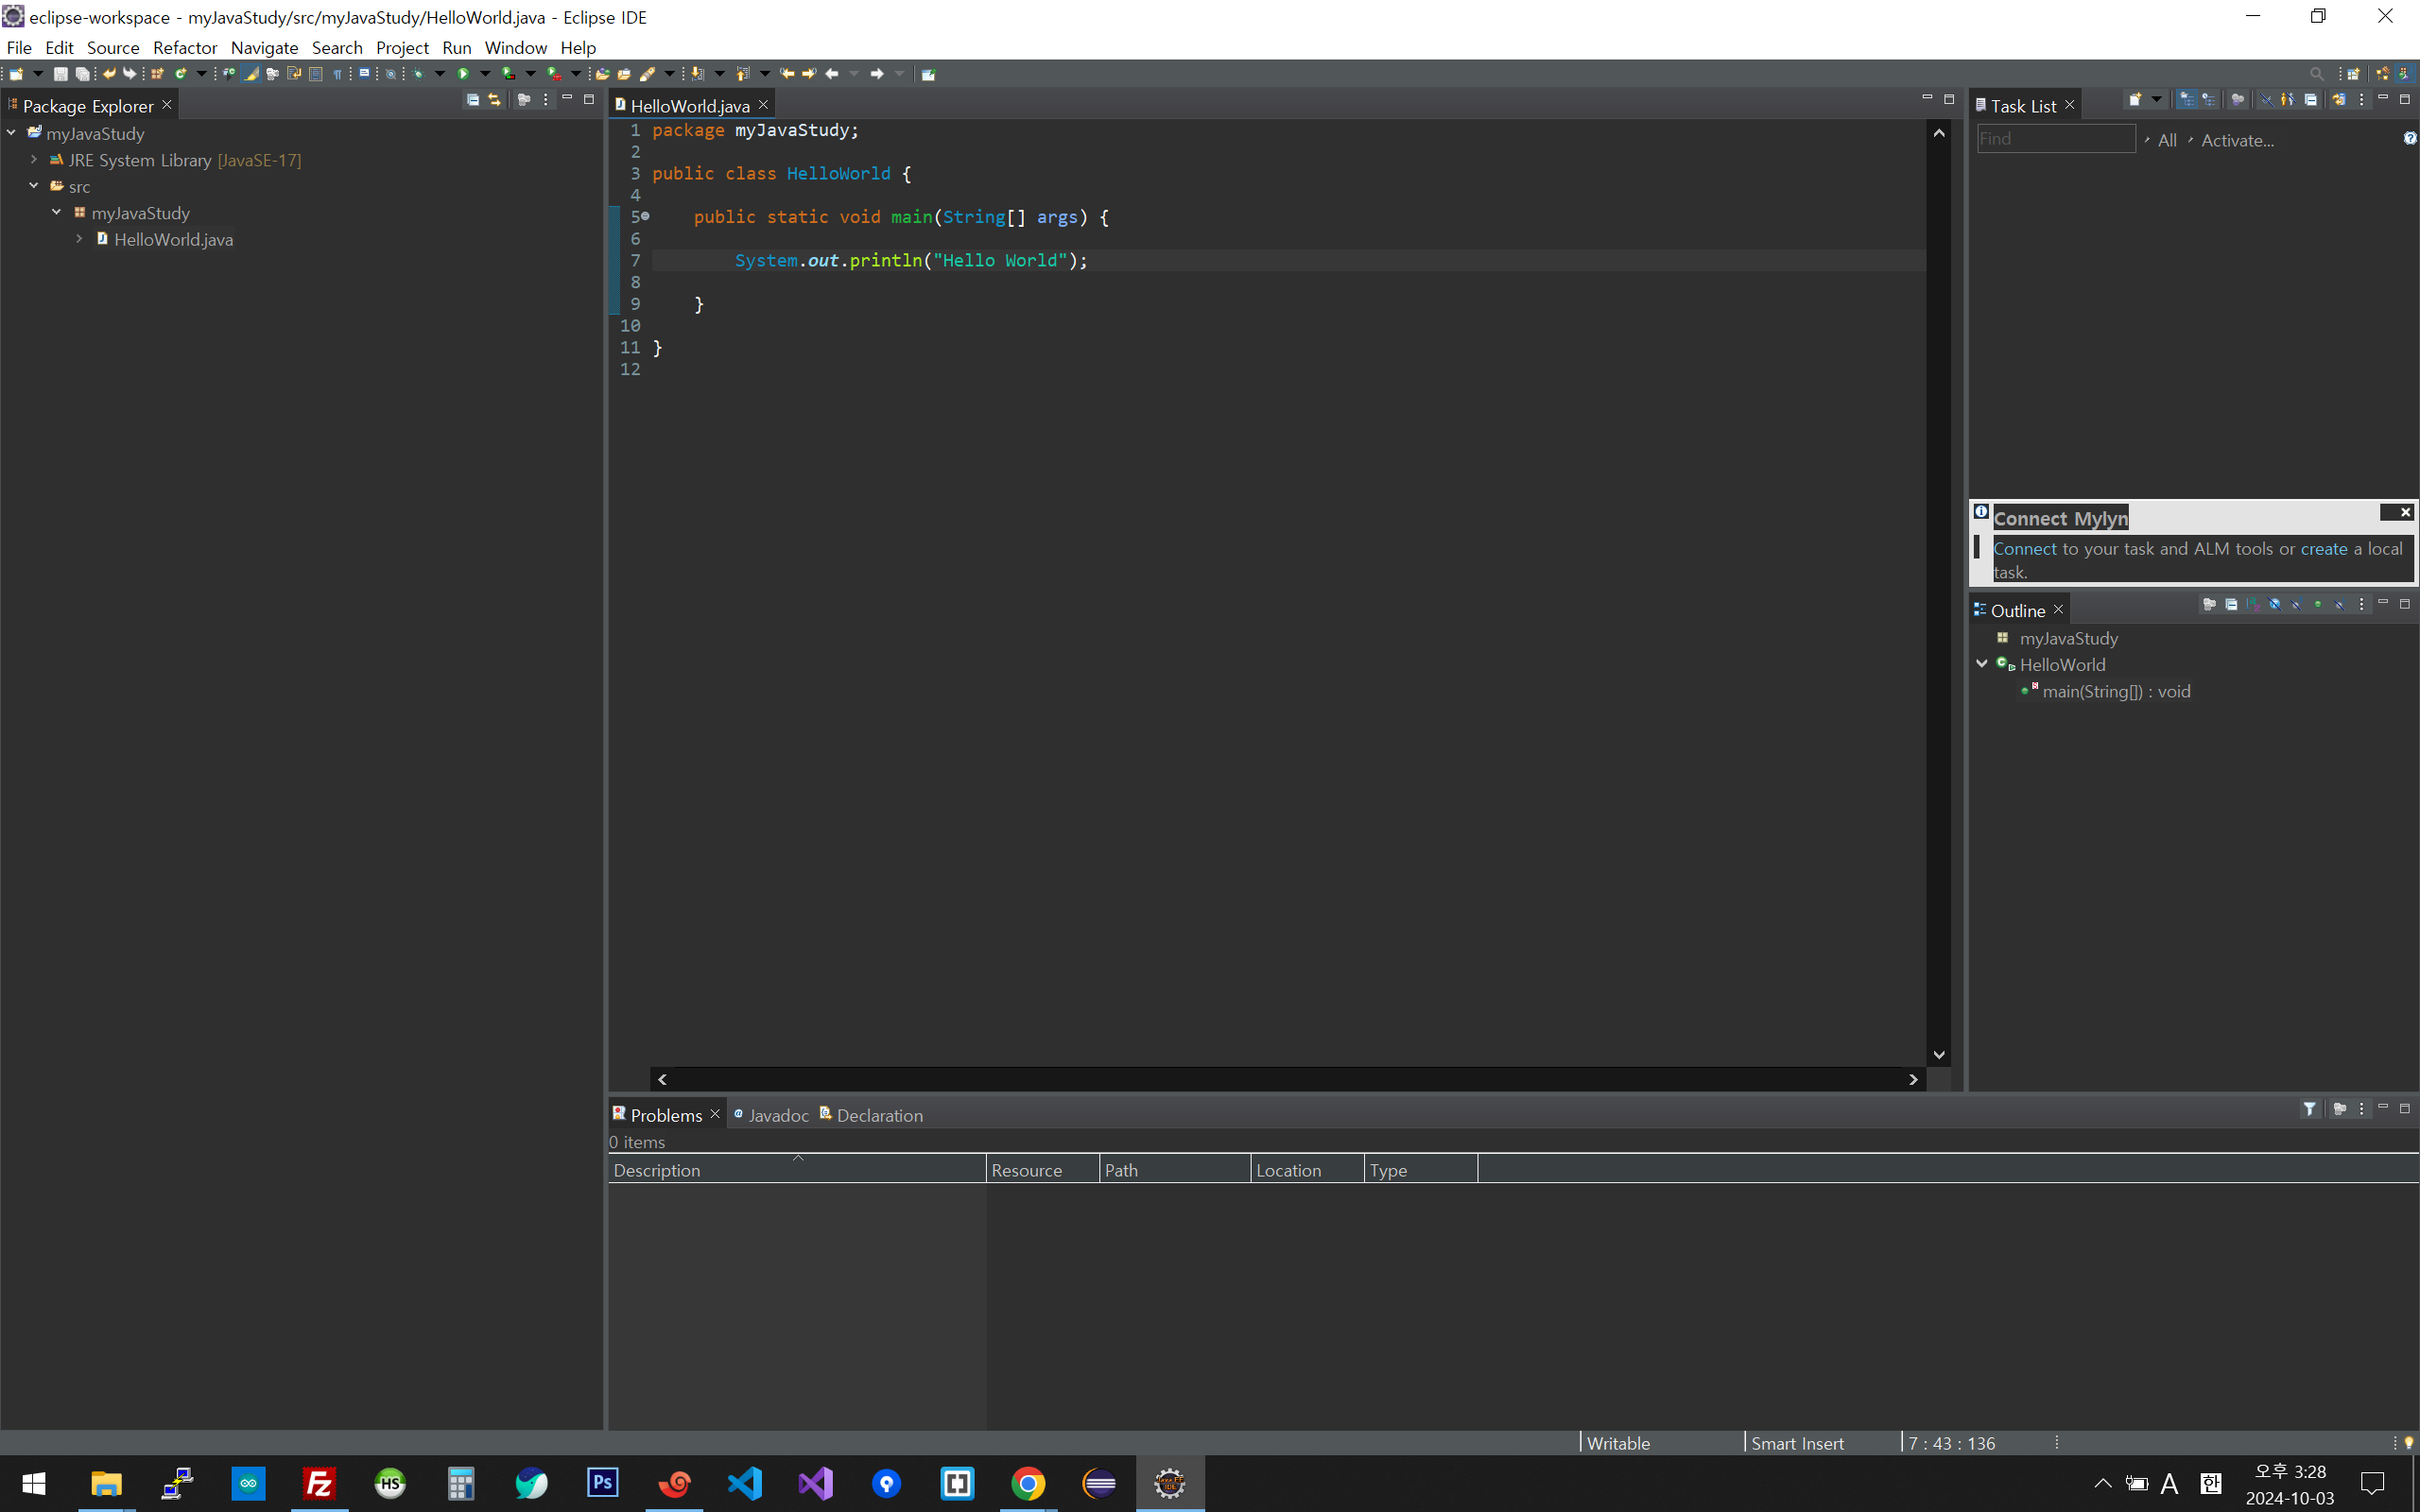
6. Hello World 클래스 생성 완료

Hello World 클래스 생성 완료


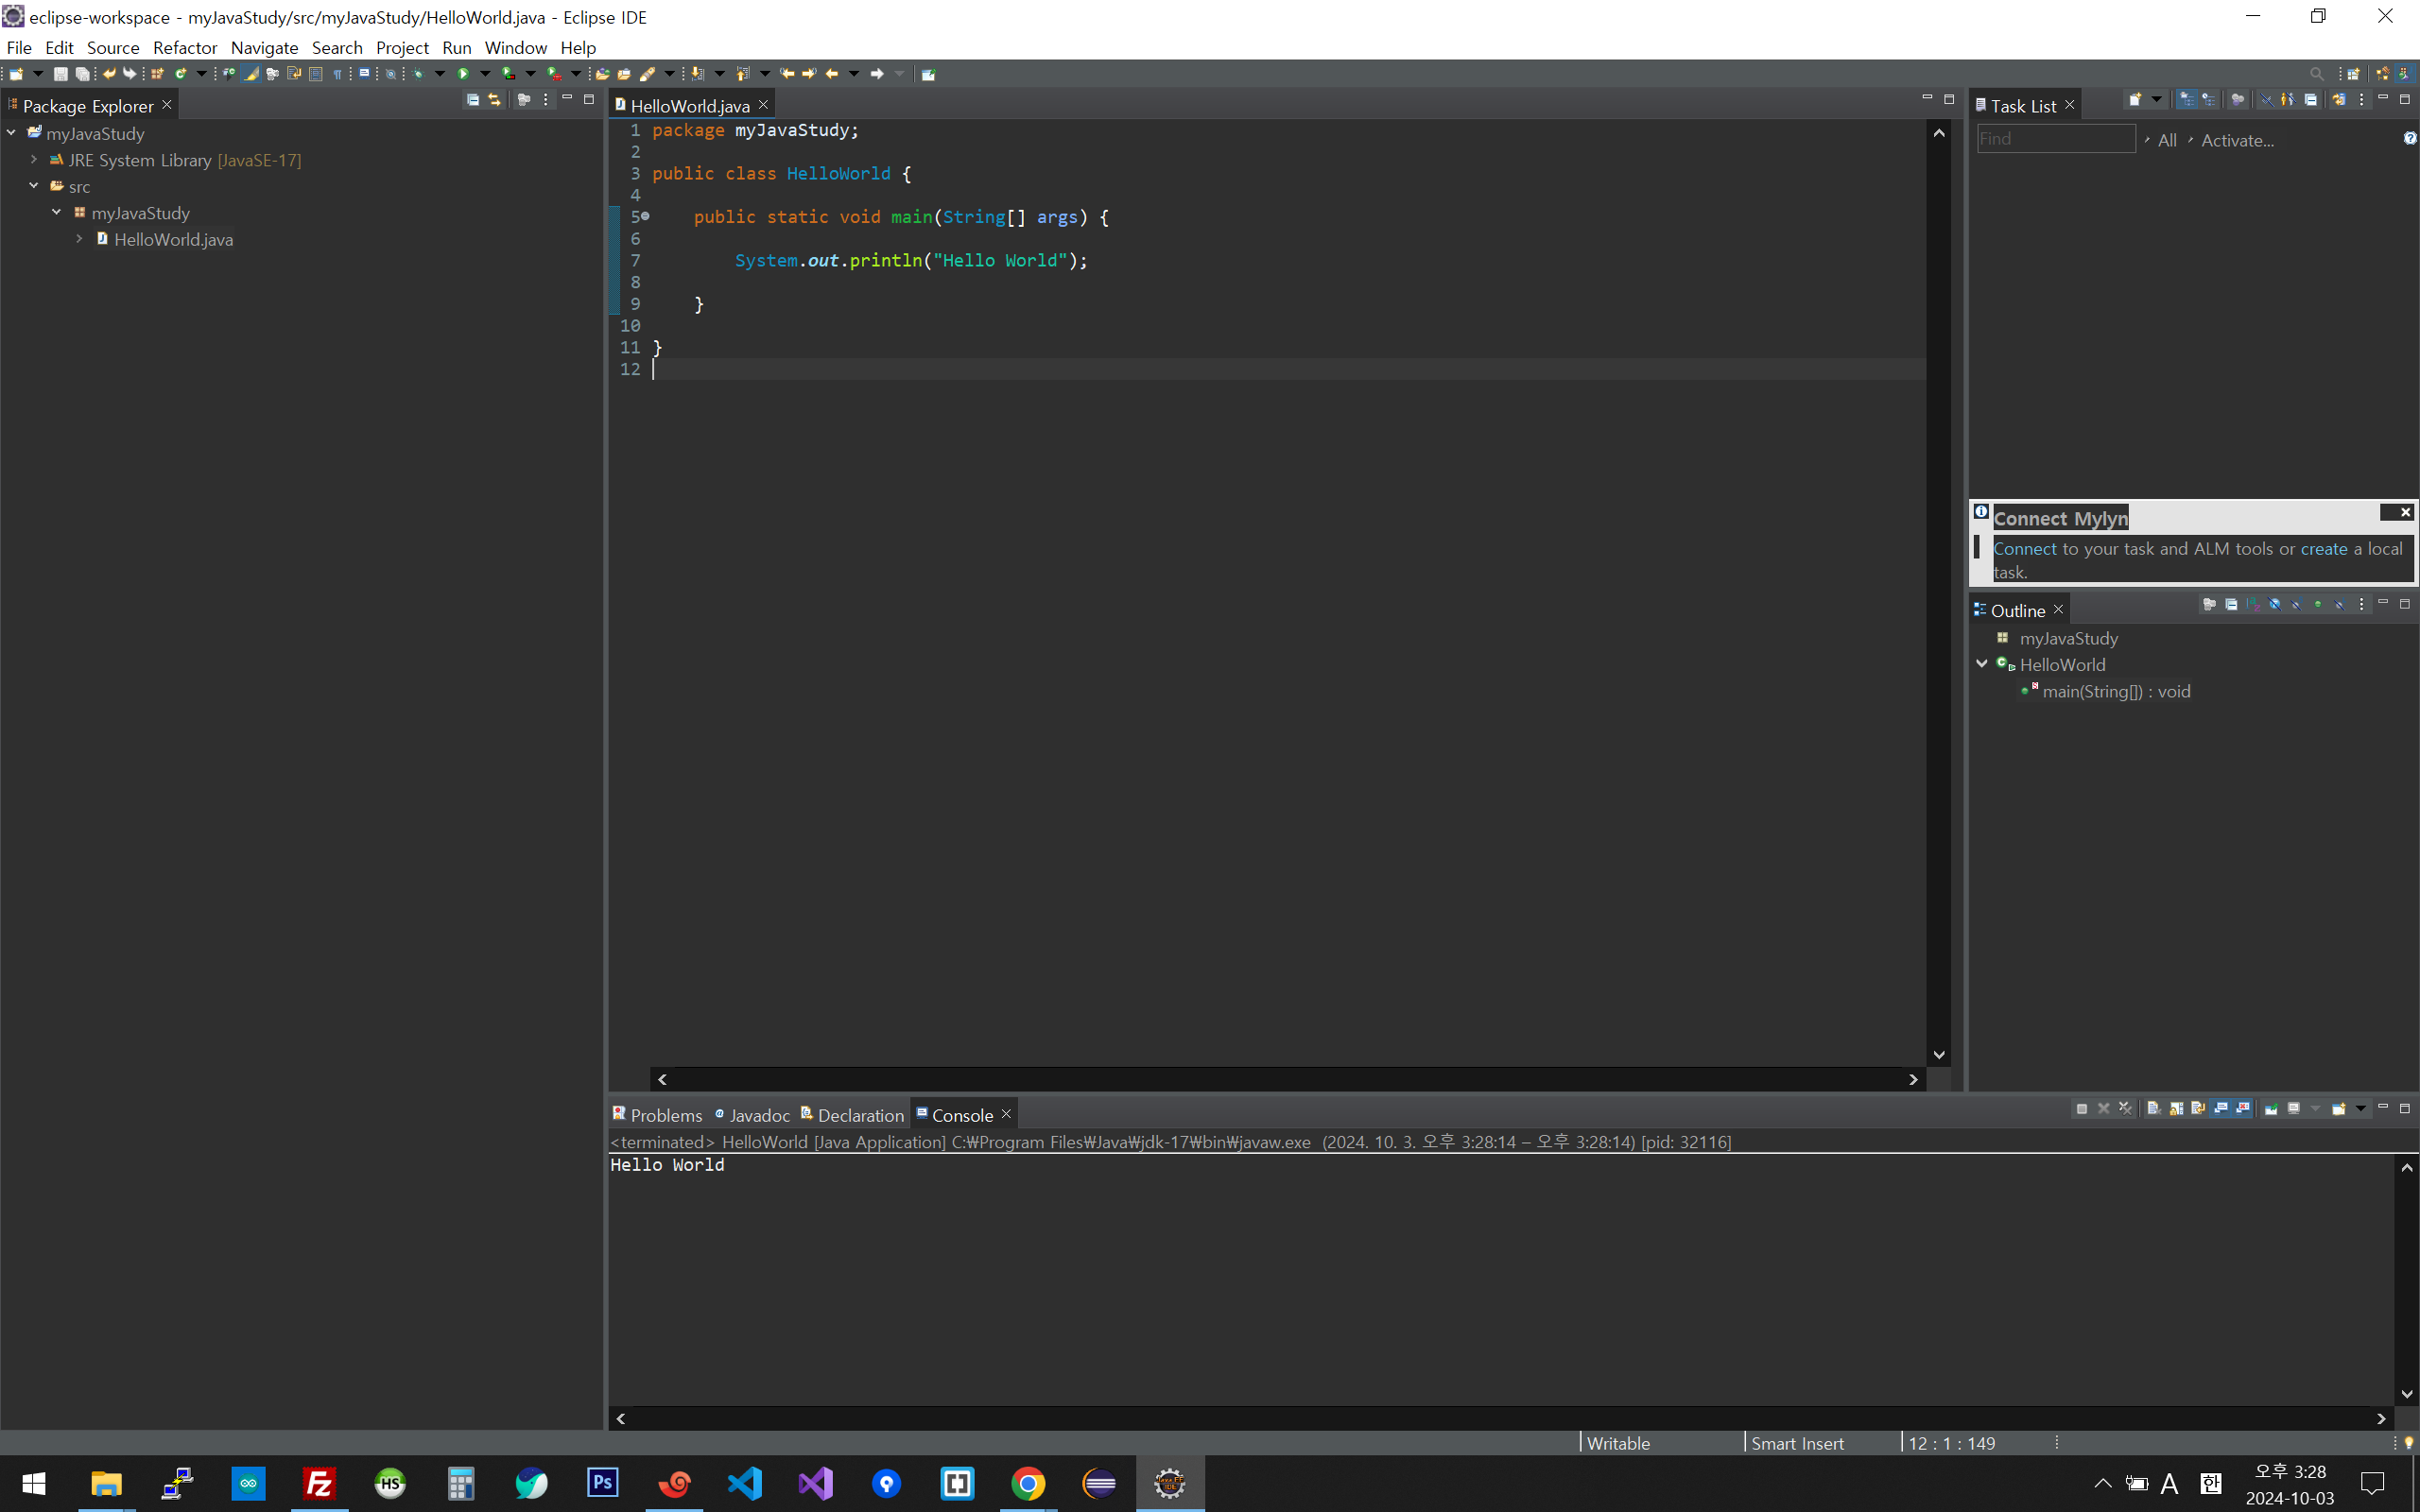
7. Hello World 출력

Hello World 출력


8. F11로 실행

반응형

'JAVA' 카테고리의 다른 글

[JAVA][05] 변수값 바꾸기1  (0) 2024.10.09
[JAVA][04] 변수(Variable)란?  (1) 2024.10.03
[JAVA][02] 이클립스 Perspective 설정  (0) 2024.10.03
[JAVA][02] 이클립스 설치  (1) 2024.10.01
[JAVA][01] JDK 설치 및 환경변수 설정  (1) 2024.10.01

+ Recent posts